 Wix © (www.Wix.com) provides a convenient platform for creating sites.
In this tutorial, we will show you two ways to embed a barcode into a site created using Wix.com.
This is a very simple method. You can find everything you need to know about this here.
You need to copy the code given here into the "body" your HTML pages. Below, we will show you step by step how to do it.
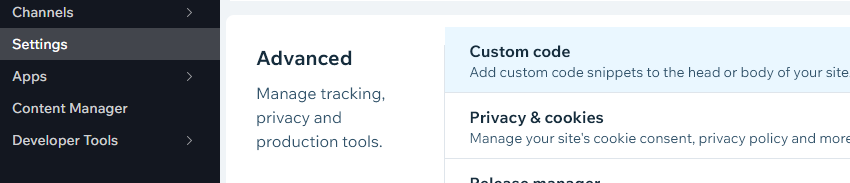
Go to the dashboard of your Wix site and select "Settings". Then tabs "Advanced" and "Custom code".
 In the section "Body - Start" click "Add Code".
Copy the scanner code into the field "Paste the code snippet here".
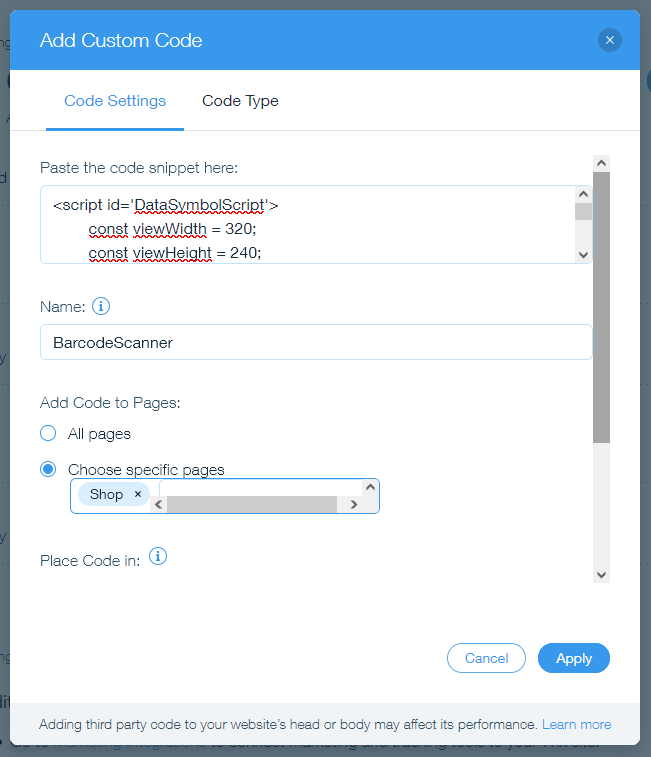
Here you can select which pages of your Wix site the barcode scanner shows.
Scanner codes will be embedded at the beginning of the "body" tag. But do not be embarrassed by this; you can place the scanner window anywhere in the page, for example, by setting the alignment.
const xAlign = 'right';				//none, left, right, float
const yAlign = 'top';				//none, top, bottom, float
Complete Code in "Paste the code snippet here" field
<script id='DataSymbolScript'>
	const viewWidth = 320;
	const viewHeight = 240;
	var leftPos = 0;
	var topPos = 0;
	const xAlign = 'right';				//none, left, right, float
	const yAlign = 'top';				//none, top, bottom, float
	const alignGap = 10;
	const opacity = 1;
	const addFrameStyle = '';			//additional settings, for example: 'border: solid 2px #fff;'
	const sWebSDKKey = '';

	var scannerSettings = {
		camera: {
			resx: 640,
			resy: 480,
		},
		barcode: {
			barcodeTypes: ['Code128', 'Code39', 'EAN13', 'UPCA', 'QRCode'],
			frameTime: 1000,
		},
	};

	var myFrame = document.createElement("iframe");
	var bStatic = (xAlign == 'none') && (yAlign == 'none')
	var myJSON = JSON.stringify(scannerSettings);
	var srcURL = 'https://websdk.datasymbol.com/srvhost/srv?ss=' + encodeURIComponent(myJSON) + '&tid=' + sWebSDKKey;
	var myFrame = document.createElement("iframe");
	myFrame.setAttribute('id', 'DataSymbolFrame');
	myFrame.setAttribute('src', srcURL);
	myFrame.setAttribute('allow', 'camera');
	myFrame.setAttribute('style', 'opacity:' + opacity + ';position:' + (bStatic?'static':'fixed') + ';z-index:10001;left:' + leftPos + 'px;top:' + topPos + 'px;overflow:hidden; display:block; margin:0; padding:0; width:' + viewWidth + 'px; height:' + viewHeight + 'px;' + addFrameStyle);
	myFrame.setAttribute('scrolling', 'no');
	myFrame.setAttribute('frameborder', '0');
	var currScript = document.getElementById("DataSymbolScript");
	currScript.parentNode.insertBefore(myFrame, currScript.nextSibling);
	window.addEventListener("resize", function(e)
	{
		setWinPos();
	} );
	document.body.onload = function(e)
	{
		setWinPos();
	};
	function setWinPos()
	{
		if( xAlign != 'none' )
		{
			if( xAlign == 'left' ) leftPos = alignGap;
			if( xAlign == 'right' ) leftPos = document.documentElement.clientWidth - viewWidth - alignGap;
		}
		if( yAlign != 'none' )
		{
			if( yAlign == 'top' ) topPos = alignGap;
			if( yAlign == 'bottom' ) topPos = document.documentElement.clientHeight - viewHeight - alignGap;
		}
		myFrame.style.left = leftPos + 'px';
		myFrame.style.top = topPos + 'px';
	}

	function bin2String (barcodeResult, dataEncoding) {
		return String.fromCharCode.apply(null, barcodeResult.data);
	}

	window.onmessage = function (e){
		if (!e || !e.data.msgType || e.data.msgType != 'DataSymbolBarcode')
			return;
		var barcodeResult = e.data.decodingResult;
		for (var i = 0; i < barcodeResult.length; ++i) {
			var sBarcode = bin2String(barcodeResult[i]);
			console.log(sBarcode);

			document.getElementById("input_comp-l4pn5fag").value = sBarcode; //replace "input_comp-l4pn5fag" with your own
		}
	}
</script>
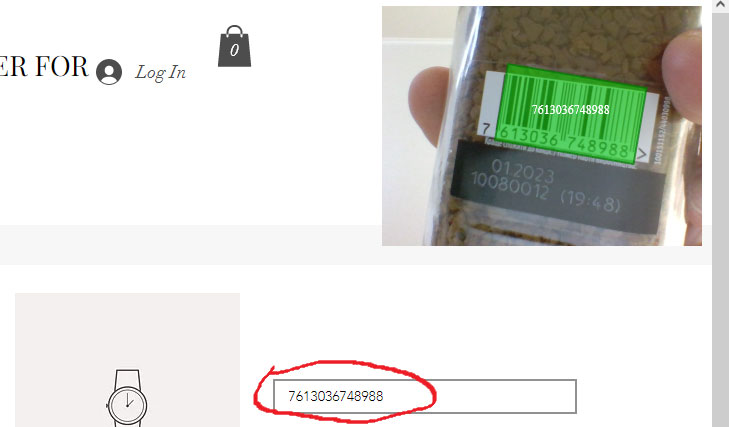
It is almost everything. Now you need to press "Publish" and the scanner will start working.
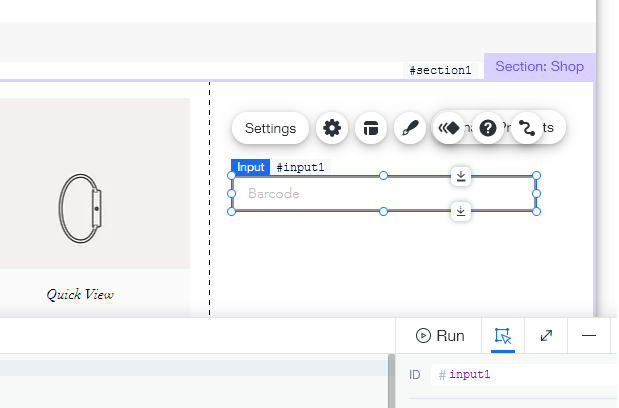
 All that remains is to get the decoded barcode. Measures you want the barcode to appear in the "#input1".
Here lies the slight inconvenience of this method of embedding the scanner barcodes.
The fact is that you cannot use "id" HTML of the element, which you see in the editor Wix (in this case "#input1"). When published, Wix converts this "id" to a completely different "id".
How to determine the actual HTML element "id” on your Wix site? Open your site in a browser and click Ctrl+Shift+I, Find the desired HTML element and its "id".
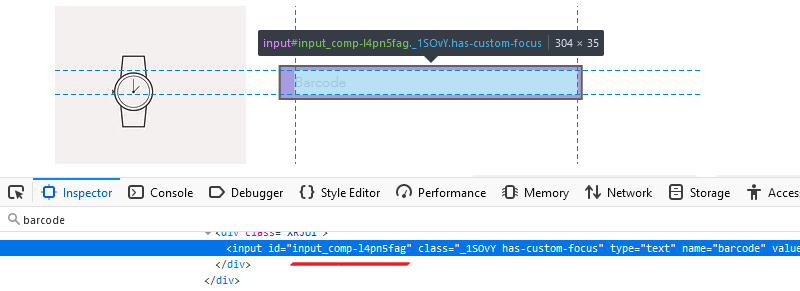
You can now use this "id".
document.getElementById("input_comp-l4pn5fag").value = sBarcode; //replace "input_comp-l4pn5fag" with your own
Now the barcode scanner is fully operational and sends the barcode to the required HTML page field.
This method of adding a barcode scanner uses only documented capabilities Wix Custom Element. You don’t need to resort to all sorts of tricks, for example, to find the element "id" it was in the previous way.
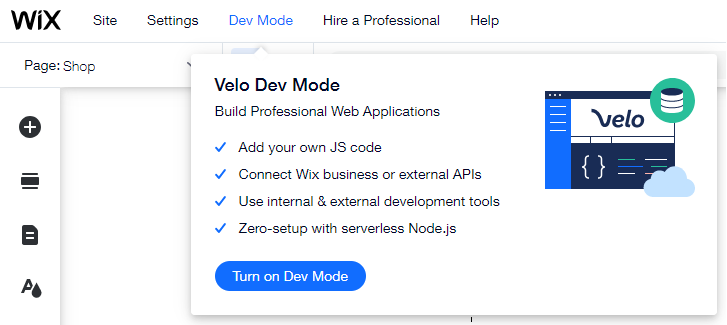
And so let’s start. First, enable "Developer Mode". This will be needed a little later when you need to add barcode event handler.
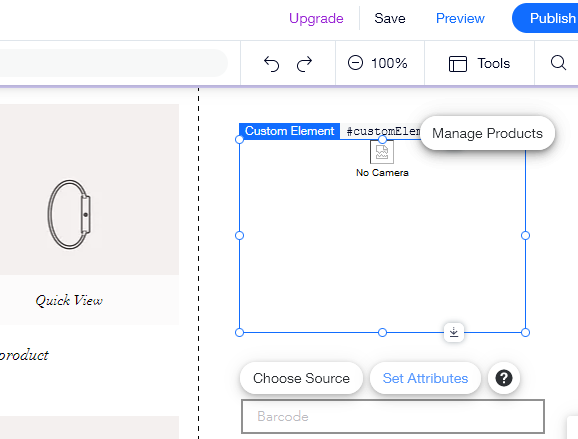
 Click the icon "+", then "Embed Code" and "Custom Element".

Will be added to the page default Wix custom element. Place it anywhere on the page.
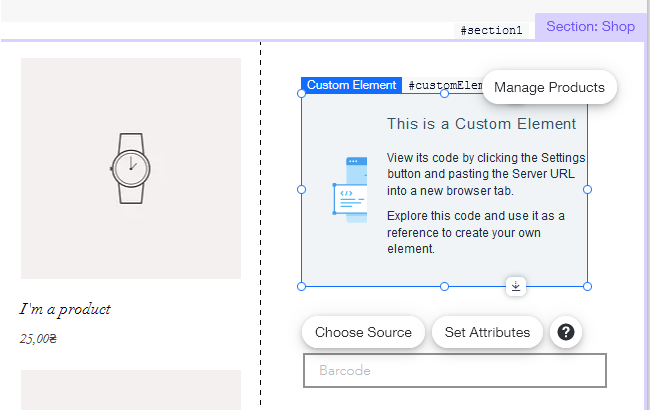 Now you need to set it up. Click "Choose Source". You will have a window in which you need to specify the URL of the element and its "Tag Name".
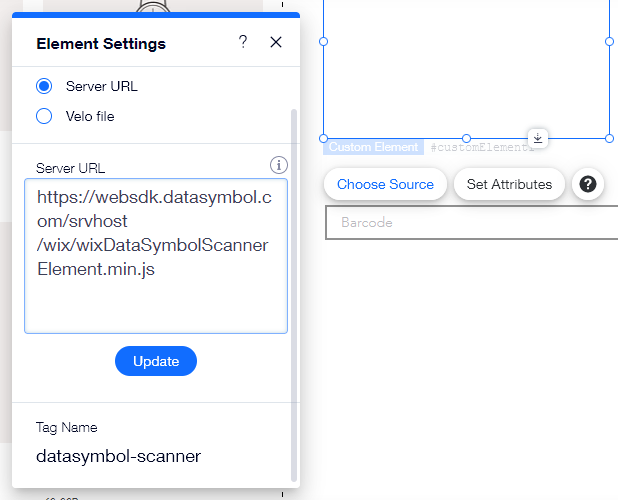
Server URL:
Tag Name:https://websdk.datasymbol.com/srvhost/wix/wixDataSymbolScannerElement.min.js
datasymbol-scanner
Press "Publish", and the scanner will start working. Barcodes will be decoded. By default, the scanner starts with the following settings
description of all Web barcode settings can be found here:
For settings the format JSON is used.{ "scanner": { "key": "" }, "viewport": { "width": 320 }, "camera": { "resx": 640, "resy": 480 }, "barcode": { "barcodeTypes": ["Code128", "Code39", "UPCA", "EAN13", "QRCode"], "frameTime": 1000 } }
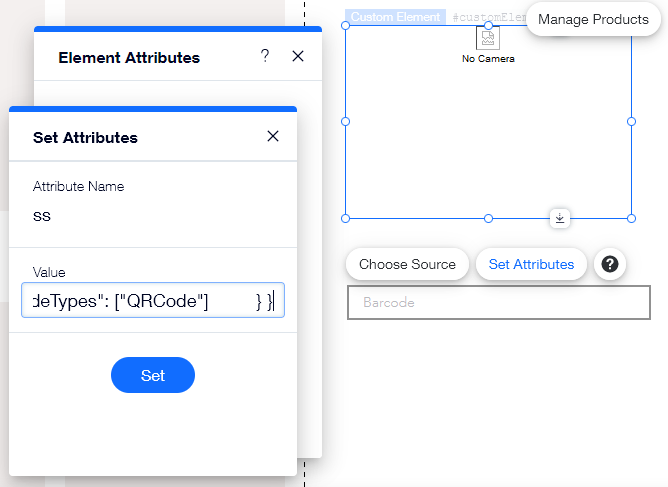
To change the default settings, you can click "Set Attributes"
For example, to decode only the QRCode you can set the following attribute "ss" (Scanner Settings):
Attribute Name:
Value:ss
{
	"barcode": {
		"barcodeTypes": ["QRCode"]
	}
}
 All that remains is to add a barcode event handler, to get the barcode.
To do this, select the page where the barcode scanner is located from the Developer panel. And in the method "onReady" write following code:
$w.onReady(function () {
	// Write your JavaScript here
	// To select an element by ID use: $w('#elementID')
	// Click 'Preview' to run your code

	function bin2String (decodingResult, dataEncoding) {
		return String.fromCharCode.apply(null, decodingResult.data);
	}

	$w('#customElement1').on('DataSymbolBarcode', (event) => {
 		if (!event.detail)
			return;
		var decodingResult = event.detail;
		for (var i = 0; i < decodingResult.length; ++i) {
			var sBarcode = bin2String(decodingResult[i]);
			$w("#input1").value = sBarcode;
		}
	});
});
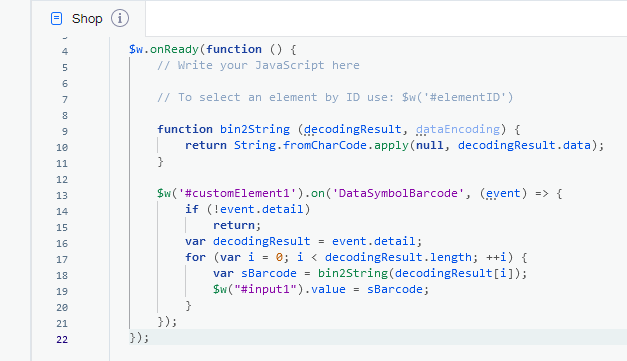
where:
customElement1 - name of your Barcode Scanner custom element
input1 - name of input field for Barcode
Don’t forget to click "Publish", to see all the changes on your site.
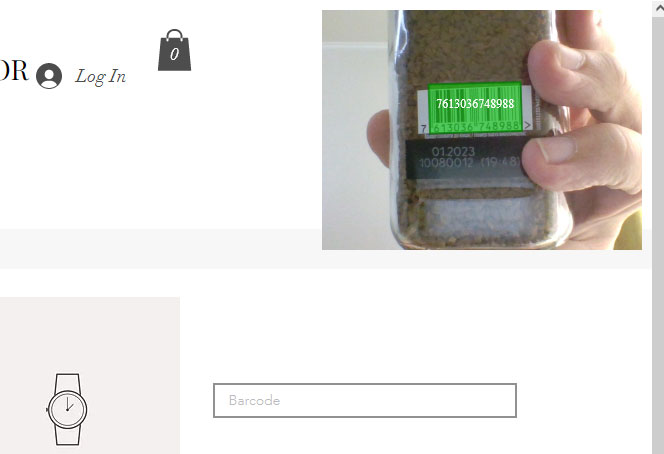
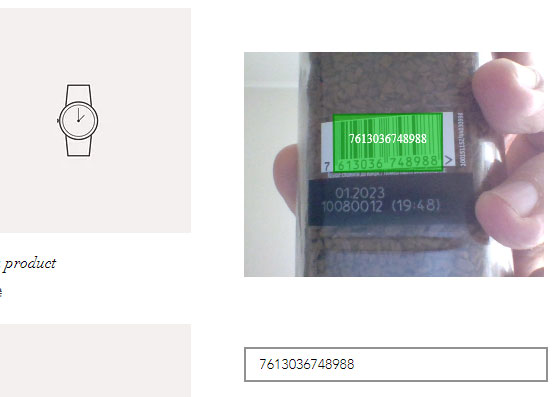
Now the scanner works, barcode appears in the "Barcode" field.
 And later you can dynamically change the settings of the scanner barcode after it has already started.
For example, in the Wix editor you can add a "Button" and in the next "Event Handler" for it.
export function button1_click(event) {
	// This function was added from the Properties & Events panel. To learn more, visit http://wix.to/UcBnC-4
	// Add your code for this event here:
		$w('#customElement1').setAttribute('ss', '{"barcode": {"barcodeTypes": ["QRCode"]}}');
}